

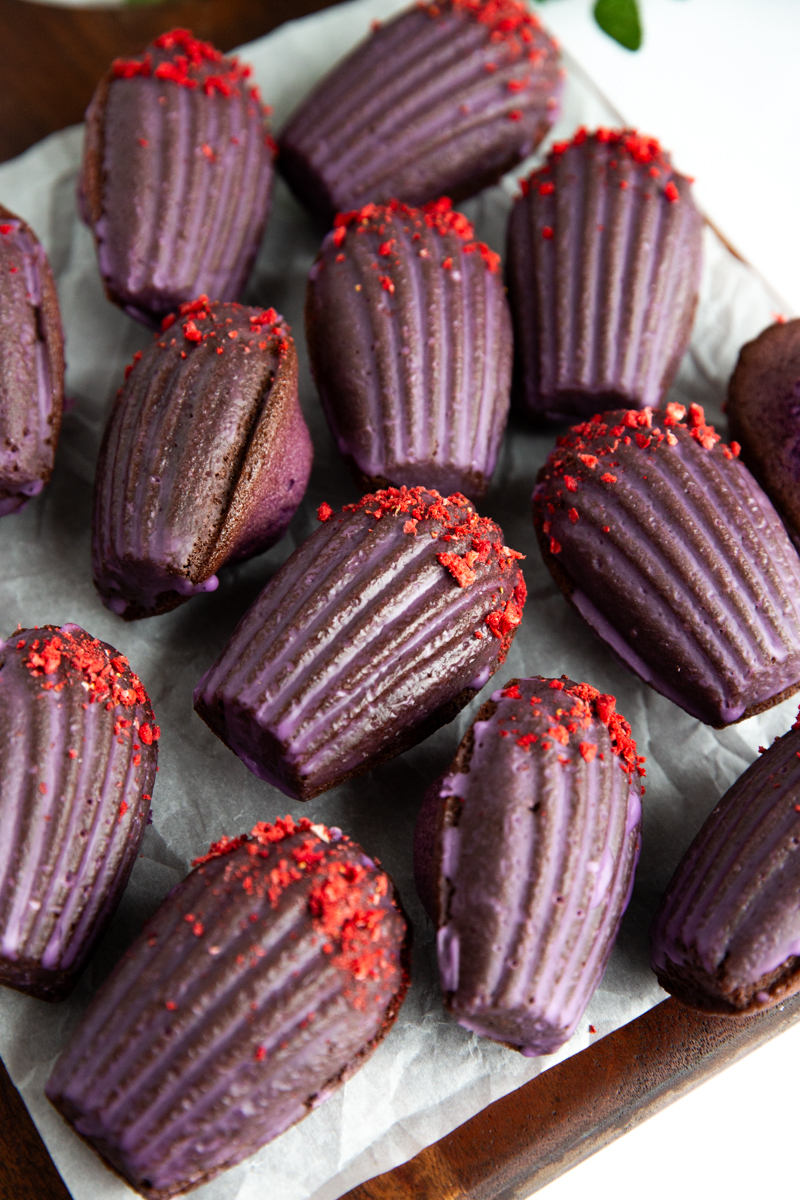
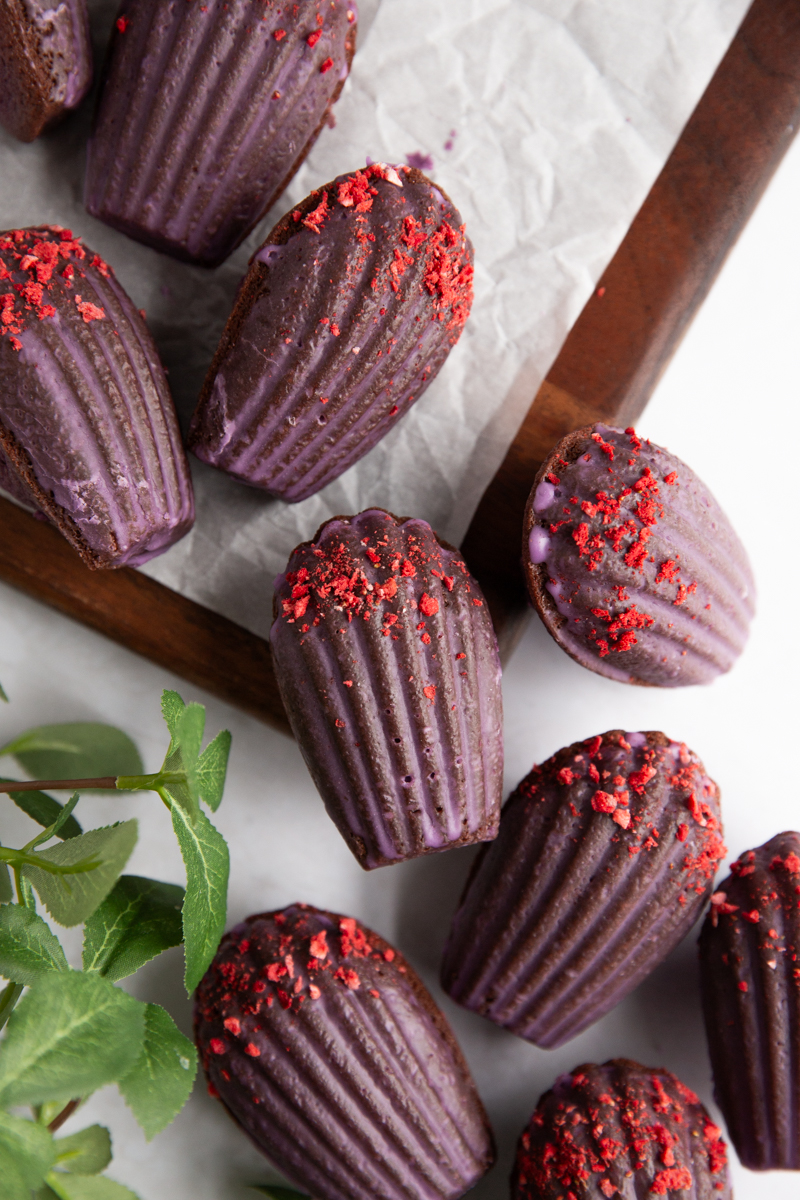
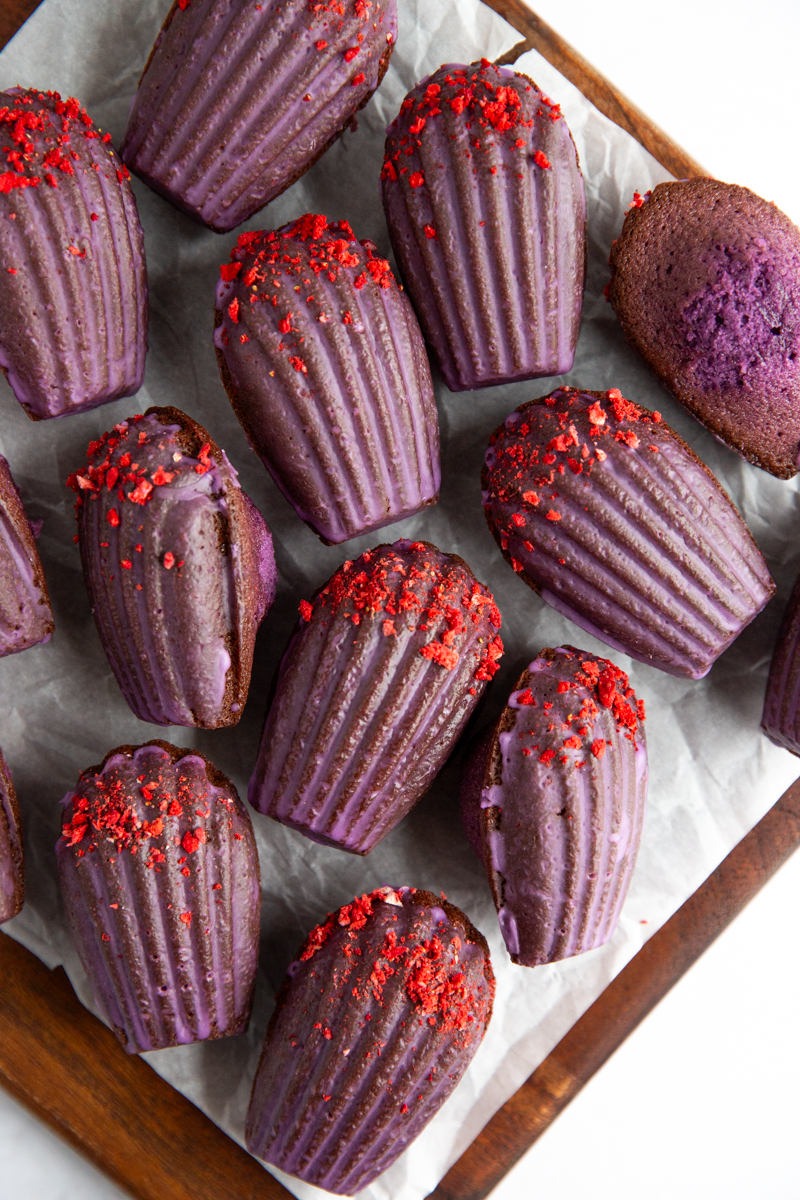
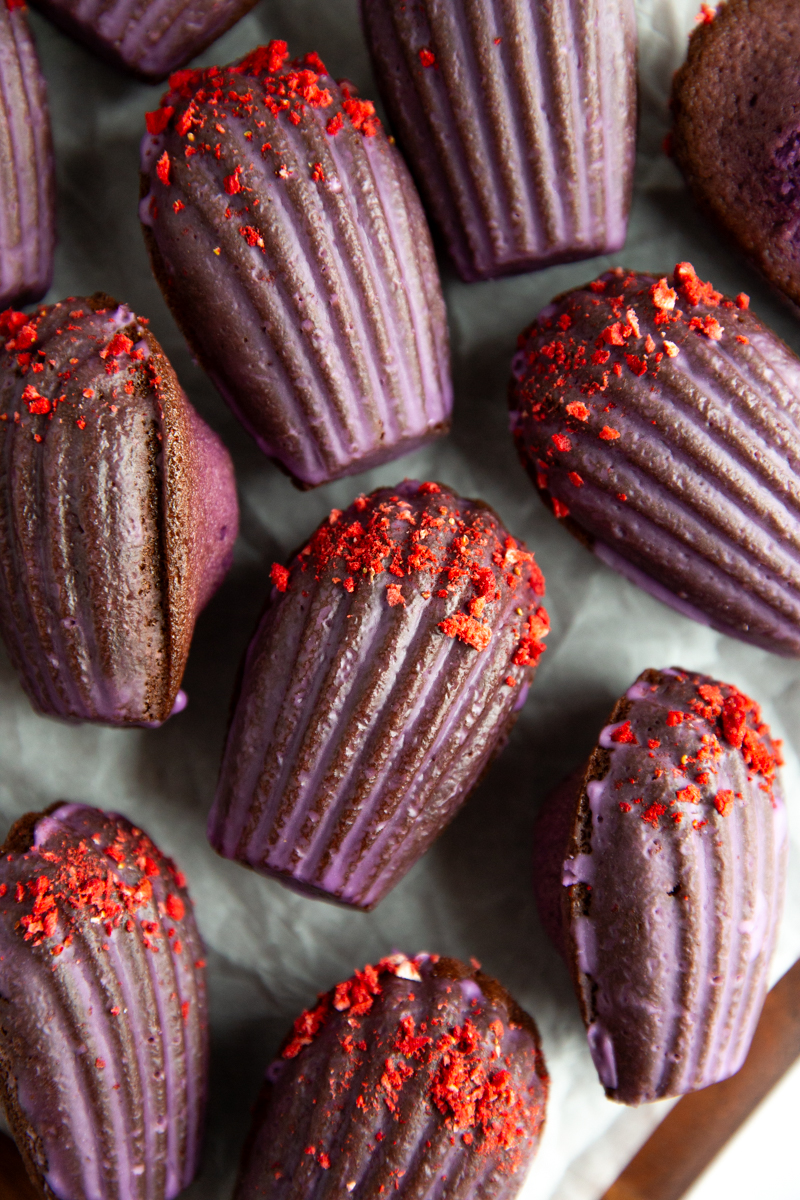
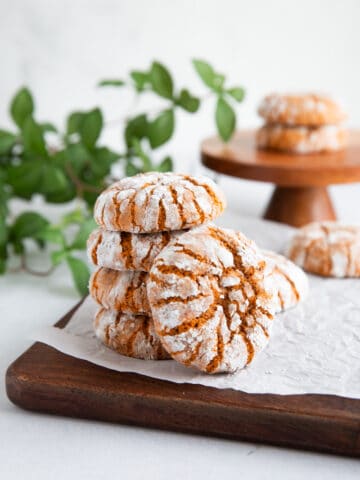
These ube glazed madeleines are dainty little sponge cakes topped with a smooth ube glaze and freeze-dried strawberry bits. Their texture is airy, and slightly spongy, with a crisp exterior that gives way to a moist and tender crumb inside. These madeleines offer a beautiful purple hue and packed with a delicious ube flavor, making them perfect as little afternoon treats!
Jump to:
What Are Madeleines?
Madeleines are tiny French sponge cakes made from a batter consisting of flour, sugar, eggs, and melted butter. The eggs and sugar are vigorously whipped together while the melted butter is gently folded in at the end to create beautifully airy and fluffy cakes. The batter then gets filled in special shell-shaped molds, and baked until the edges turn golden brown and the centers spring back when touched. The signature hump on the back of the madeleine is achieved through a quick burst of high heat at the beginning of baking.
While technically classified as small butter cakes, madeleines are often referred to as cookies due to their small shape and size. They have a denser texture compared to traditional cakes, but remain significantly lighter and fluffier than typical cookies. But whether you call them cookies or cakes, all madeleines must possess two essential features: a beautifully scalloped, shell-shaped exterior on one side and a distinct hump on the other!
What is Ube? What Does Ube Taste Like?
Ube (pronounced "oo-bay") is a vibrant purple yam originating from Southeast Asia and prominently featured in Filipino cuisine. With its rich purple flesh that varies in hue, ube tastes slightly nutty with a hint of sweet vanilla. It has a coconut-like aroma that lends itself well to dessert items. Ube is most often boiled, mashed, and mixed with condensed milk to bring out its sweetness. No wonder this starchy yam has become a beloved ingredient in a range of desserts! This time, we'll be adding this flavor to these madeleines to add a pop of natural purple color, and to balance sweetness with flavorful depth!
Why You'll Love This Recipe
- These madeleines have a super soft, delicate and tender texture.
- Perfectly shell-shaped on one side with the classic madeleine "hump" on the other.
- Not greasy at all. It has a buttery, melt-in-your-mouth taste!
- Beautiful purple color from the ube with just barely crisp exteriors.
- The ube glaze makes this pastry sweet, but not overly sugary!
- Easy to make with just a few ingredients and you can even prepare the batter a day before.
Tools
- Stand mixer fitted with a whisk attachment or hand mixer - Achieving light and fluffy madeleines depends greatly on aerating the eggs thoroughly by whipping them at high speed with the sugar. For best results, use the whisk attachment on your stand mixer or a hand mixer. If you don't have either, you can also whisk by hand. This will require more time and some of your upper-arm muscles!
- Sifter - So important for cupcakes made with cake flour as it helps aerate and evenly distribute the flour, resulting in a lighter and more delicate texture.
- Piping bags (optional) - Used to pipe the madeleine batter into the molds. This is my preferred (no-fuss) method, but you can also scoop them into the molds as well!
- Madeleine pan - This pan is essential for making these madeleines! However, choosing the right pan is also just as important. I prefer the Korean-brand madeleine pans that offer deep cavities and are silicone coated. Keep in mind that silicone coated materials are more difficult to manufacture, so the prices are significantly higher. My Korean-brand madeleine pans were definitely an investment, but I believe they were worth every penny. While I prefer this specific type, feel free to use any madeleine pan you have on hand to make this recipe! I recommend this USA-brand madeleine pan as an alternative.
- Pastry brush - Used for even distribution of melted butter in each cavity when greasing the madeleine pan. It's also used for brushing the ube glaze on top of each madeleine at the end.
Ingredients
- Vanilla bean - Vanilla extracts tend to have a weak, artificial flavor when it comes to French pastries like madeleines. If you can get your hands on some fresh vanilla beans, use those instead!
- Granulated sugar - I rub the vanilla bean seeds together with the sugar. This process, known as "bruising" the vanilla beans, helps to release and distribute the aromatic oils from the vanilla beans. This will impart a more intense vanilla flavor throughout the madeleines!
- Eggs - Eggs play a crucial role in the texture of madeleines! By whipping air into the eggs and sugar, madeleines achieve their characteristic light and fluffy texture. Make sure they are at room temperature, or you can leave them in a bowl of warm water for 5 to 10 minutes if you forget to do this beforehand. Otherwise, they may not reach their full volume when whipped.
- Unsalted butter - The butter should be melted and cooled before adding to the madeleine batter. Cooling the melted butter to 105-120°F (40-50°C) before adding it to the batter to ensure that it doesn't cook the eggs and maintains the desired consistency of the mixture for light and fluffy madeleines.
- Cake flour - I have tried other flours and found that cake flour creates the most tender crumb.
- Salt
- Baking powder - Although most traditional madeleines recipes do not use raising agents, I use aluminum-free baking powder to achieve that classic hump.
- Milk - I recommend full-fat, whole milk for that rich flavor.
- Honey - The honey in the recipe does a great job of keeping these madeleines fresh, soft, and moist! I used a local raw honey.
- Ube extract - Ube extract is a concentrated form of flavor derived from purple yams. This particular brand is used in the madeleines and the glaze to infuse them with the distinct taste and vibrant purple color of ube.
- Powdered sugar - Sift your powdered sugar for a smooth glaze. If you don't prefer to top your madeleines with a glaze, you can also just dust them with powdered sugar, which is the traditional way of enjoying these madeleines!
- Freeze-dried strawberries - I use a knife to cut the strawberries into little tiny (almost powdery) pieces. Sprinkle on top each madeleine to complement the ube taste!
Tips and Tricks
- All ingredients should be at room temperature. This includes the eggs and milk. Room temperature ingredients ensures more even mixing and distribution of ingredients, resulting in a smoother batter consistency and better incorporation of air during whipping. This will result in lighter and more uniform texture in the finished madeleines.
- Beat the eggs and sugar well. This will be one of the most important steps when making madeleines. Whether you are using a stand mixer, hand mixer, or a whisk by hand, you want to mix for a long time. Visually, you want the mixture to be very pale and thick, so trust your gut when you think it's ready!
- When folding in the melted butter, ditch the mixer/whisk and use a spatula. Make sure to gently fold in the ingredients using a spatula to prevent overmixing. Overmixing can lead to a denser texture in the final product. So fold in the butter just until fully incorporated to maintain a light and fluffy madeleine texture.
- Do not skip the chilling step. Chilling the batter allows the gluten to develop, relax, and fully absorb the moisture from the butter, resulting in a cohesive texture that binds the airy eggs and a beautifully aerated batter. I also noticed that there is a difference between 4 hours chilling and 12 hours chilling (overnight). Longer chilled batter resulted in more pronounced humps. But 4 hours will do the job too!
- Grease the madeleine pan with a thin layer of melted butter. I don't recommend using a cooking spray - this gave an aftertaste to the madeleines. I also don't recommend using flour for dusting the pan either - additional flour will not only affect the taste but also result in more bubbles forming on the surface of your madeleine shells.
- In addition to chilling your batter, you can also chill your madeleine pan right before filling with batter. Remember, we want to create a state of thermal shock to encourage a quick rise in the madeleines. To promote this even more, we can chill the madeleine pan in the freezer for 5 minutes after greasing it with butter and before filling with batter. This will create a better chance for perfectly "humped" madeleines!
- Place your batter into a gallon size ziplock bag and "pipe" into each cavity. I found that this is better and more efficient than scooping your batter with a cookie scoop. This allows for me to control how much batter goes into each cavity, which results in even, uniform madeleines and a perfect finished product!
Storage Instructions
- Storing - Madeleines are best enjoyed when consumed on the day they are baked, preferably within a few hours of being made for that melt-in-your-mouth texture. However, you can store baked and glazed madeleines in an airtight container for up to 3 days, if necessary. Madeleines stored in the refrigerator can remain fresh for up to 5 days. Wait for the glaze to set before placing them in the container.
- Freezing baked, unglazed madeleines - Make sure to cool your madeleines completely. To prevent madeleines from sticking, freeze them individually by arranging them on a plate and placing them in the freezer for about one hour. Then wrap each one in plastic wrap and place in a large ziplock bag or container. They can be stored for up to 2-3 months without significant loss of flavor and texture. When ready to enjoy, let them thaw at room temperature for around 30 minutes. You can also pop them in a preheated oven (350°F/180°C) and bake for about 3-5 minutes, or until they are warmed. Be careful not to overheat them since they can dry out!
Frequently Asked Questions
I DON'T HAVE VANILLA BEANS. CAN I SUBSTITUTE WITH VANILLA PASTE OR EXTRACT?
Absolutely! Skip step 1 ("prepare vanilla and sugar mixture") and instead, add 1 teaspoon of vanilla extract or vanilla bean paste to step 4 ("combine other wet ingredients").
MY MADELEINES DON'T HAVE THAT SIGNATURE HUMP.
The signature hump on madeleines is formed when the batter is chilled before baking and then exposed to high heat, causing the air bubbles in the batter to expand rapidly. This state of thermal shock promotes a quick rise, which creates a light and fluffy interior. If your madeleines are not developing this hump, it could be due to several factors such as:
- Not chilling the batter long enough.
- Solution: Do not skip this step! For the best results, chill the batter overnight.
- The oven temperature being too low.
- Solution: I highly recommend getting an oven thermometer to make sure your oven is set at the right temperature.
- Overmixing the batter, which can deflate the air bubbles. Knocking the air out of the batter will lead to flat and dense madeleines.
- Solution: Gently fold the ingredients together, especially at the end when you are mixing in the remaining madeleine ingredients.
MY MADELEINES ARE DRY.
There are several factors that could contribute to dry madeleines:
- Overbaking.
- Solution: Bake a few minutes less next time, or watch until the edges of the madeleines turn crispy, golden and not burnt.
- Too much flour or not enough liquid ingredients. Adding too much flour can result in a dense and dry texture while not enough liquid ingredients (such as eggs or butter) can result in dry madeleines.
- Solution: Double-check your measurements! Measure all your ingredients accurately and consider using a kitchen scale for precision. That's why most of my ingredients are in grams!
- Overmixing. Excessive mixing can develop the gluten in the batter, leading to a tougher texture.
- Solution: Mix the batter just until the ingredients are combined to avoid overworking it.
- Incorrect oven temperature. Baking at too high a temperature can cause the madeleines to dry out quickly.
- Solution: I highly recommend getting an oven thermometer to make sure your oven is set at the right temperature.
- Storing improperly. Improper storage can lead to moisture loss.
- Solution: Store the madeleines in an airtight container once they've cooled to retain their moisture.
WHAT IF I DON'T WANT TO BRUSH THE GLAZE ON TOP?
Then you don't have to! You can always just dust some powdered sugar on top, or dip the shell side in melted chocolate. Get creative!
CAN I BAKE THE BATTER WITHOUT A MADELEINE PAN?
Though the distinctive shell-shape is what gives these little cakes their identity as madeleines, you can still bake the batter in muffin pans to make cute tea cakes!
Print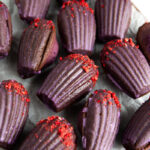
Ube Glazed Madeleines
- Prep Time: 4 hr 30 min
- Cook Time: 10 min
- Total Time: 0 hours
- Yield: 14-15 madeleines 1x
- Category: French
Description
These ube glazed madeleines are dainty little sponge cakes topped with a smooth ube glaze and freeze-dried strawberry bits. Their texture is airy, and slightly spongy, with a crisp exterior that gives way to a moist and tender crumb inside.
Ingredients
UBE MADELEINES
- 1 vanilla bean
- 145 g granulated sugar
- 140 g unsalted butter, melted
- 3 eggs
- 160 g cake flour, sifted
- pinch of salt
- 1 tsp baking powder
- 15 g honey
- 10 g milk
- 1 ½ tsp ube extract
UBE GLAZE
- 80 g powdered sugar, sifted
- ½ tsp ube extract
- 3 tbsp freeze-dried strawberry, cut up into bits
Instructions
UBE MADELEINES
- Prepare vanilla and sugar mixture - Cut the vanilla bean in half and scrape the insides with a knife to release the seeds. Add the seeds to the granulated sugar and use your fingers to rub them together. You want to release the aroma from the vanilla! Set aside.
- Melt the butter - Melt the butter in a small saucepan over medium heat. Take off the heat and place the leftover the vanilla pod in the butter mixture. Set aside to cool to 105-120°F (40-50°C).
- Sift dry ingredients - In a medium bowl, sift together the flour, baking powder, and salt. Set aside.
- Beat the eggs and sugar - In a large mixing bowl, beat the eggs and granulated sugar together with an electric mixer on high speed until pale and thick, about 5 minutes, or by hand for about 10 minutes.
- Combine other wet ingredients - Add the milk, honey, and ube extract. Mix just until combined.
- Add the dry ingredients - Gradually add the dry ingredients to the wet mixture, mixing gently until just combined.
- Fold in melted butter - Slowly pour in the melted butter. Using a spatula, fold the batter gently until the butter is fully incorporated into the batter.
- Chill - Cover the batter plastic wrap and chill for at least 4 hours or overnight. This will create that signature hump on the madeleines!
- Preheat and grease - When ready to bake, preheat oven to 390°F (200°C). Melt 1-2 tablespoons of butter and use to grease each cavity of your madeleine pan. Chill the pan in the freezer for 5 minutes before filling.
- Fill each cavity - Pipe the batter into the cold madeleine pan, filling each cavity about ¾ full.
- Tap the pans - After filling the molds with the batter, tap the pans gently on the countertop to release any air bubbles and level out the batter.
- Bake - Immediately bake at 390°F (200°C) for 10-12 minutes or until the edges of the madeleines are golden brown and have that signature hump. Remove from the oven and let it cool in the cavities for 2-3 minutes before transferring them to a wire rack.
UBE GLAZE
- Prepare ube glaze and strawberry bits - Combine the sifted powdered sugar and ube extract until you get a smooth mixture. Set aside. Take the freeze-dried strawberry pieces and using a knife, cut them into little powdery bits.
- Brush on the glaze - When the madeleines have completely cooled, use a pastry brush to top the shell side of each madeleine with a layer of ube glaze. Make sure to be generous with the application!
- Sprinkle with strawberry bits - Top each madeleine with a sprinkle of the freeze-dried strawberry bits.
Leave a comment or review